Facebook or Meta is the third most popular website, with over 98% accessing it on a mobile device. It is the most popular social media platform in the world. Facebook Stories receive over 500 million views a day. Besides these facts, it is worth knowing that video marketing is the most sought-after promotional medium on this platform. If you have a business, you have every reason to build your presence on Facebook.
1. Benefits of a Meta Business Account
There are many benefits of creating a meta business account. Some often most important reasons for building your business presence on Facebook are as follows:
- Cost-effective promotion
- Direct engagement with customers
- Reaching a wider audience
- Deeper insights and analytics
- Improved SEO
- Improved business credibility
2. Steps for Creating a Meta Business Account
Now you know the benefits of creating a Meta business account, you can follow these steps to create your account:
1. Create a Personal Meta Account
A Meta business page requires a personal account for management. The personal account will act as the business page’s administrator. Keep in mind that your business page can have multiple administrators.
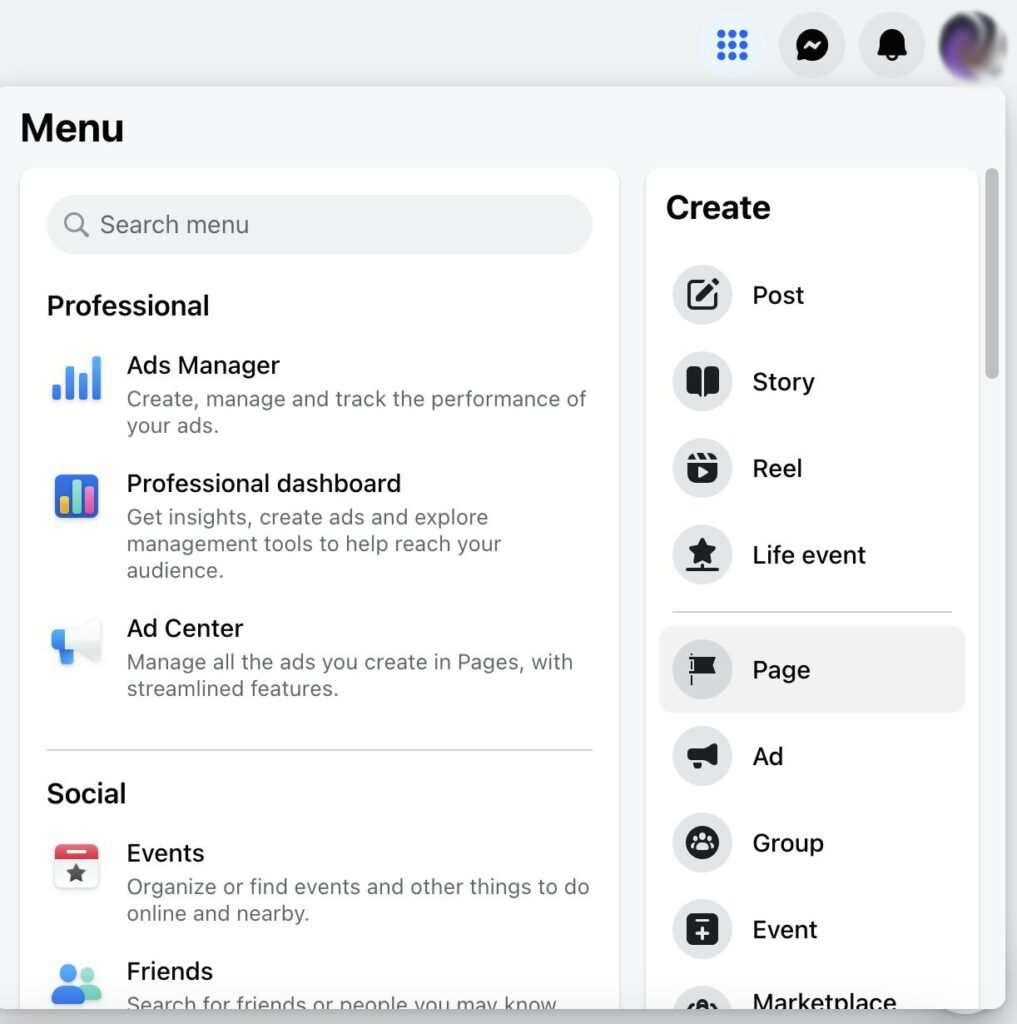
You can either create a new personal Meta account or use your existing account to create a business account.
- Log into your personal account and then click on ‘create a page link’.
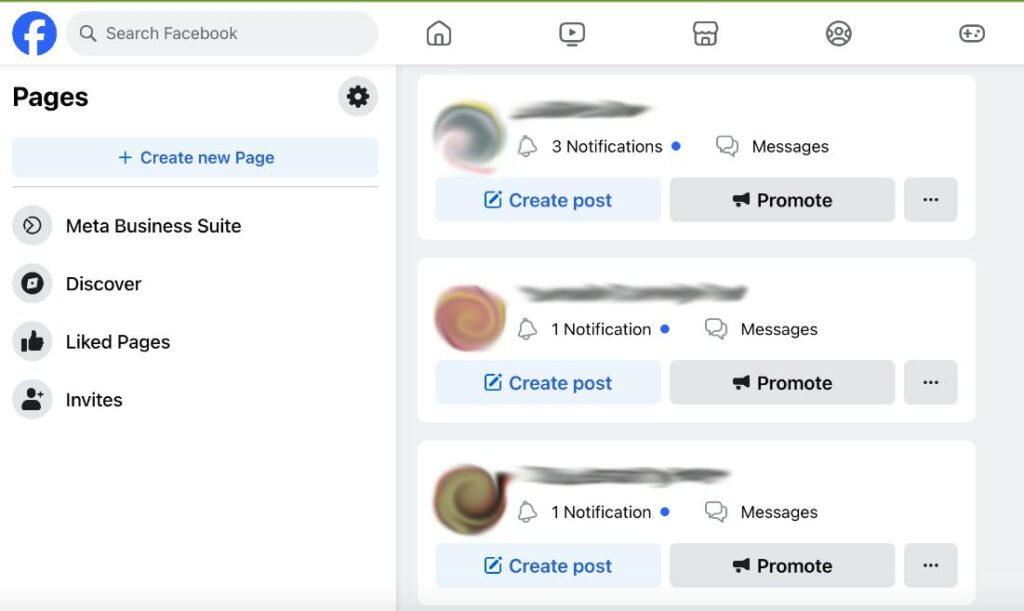
Another alternative is to navigate to the ‘pages’ menu within your Meta account. Then, click on ‘create new page’.
2. Fill-in your Business Details
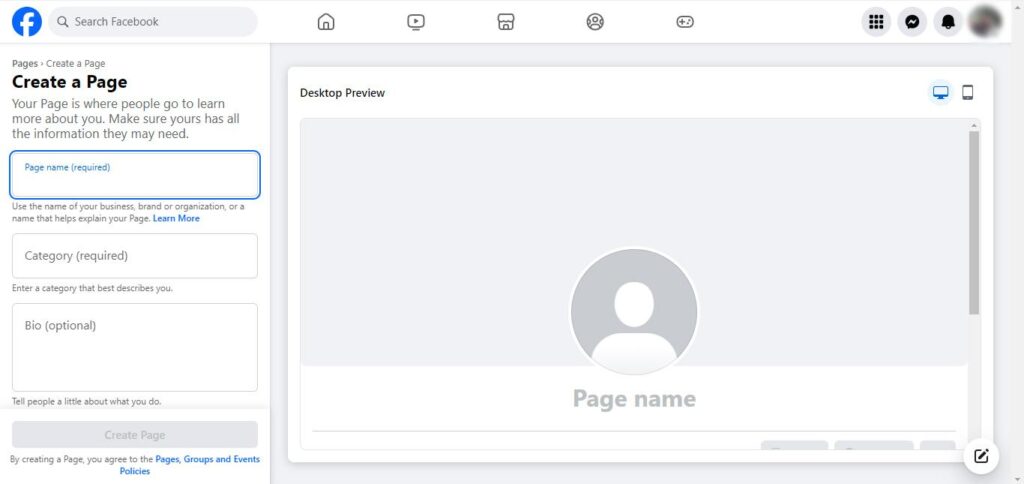
Next, you should fill-in all the details about your business.
- Enter the name for your business page. This will usually be your company’s name. It can also be the name of a specific branch of your company.
- Next, you should enter the Category that matches your business’ profile.
- Next, you can fill-in the Bio section. This is an optional section, but it is recommended to provide as much details as possible. Make sure to include keywords to help boost your search engine rankings.
- Click on the ‘create page’ button once you have filled-in all the details.
Keep in mind that all the info can be edited later on.
3. Enter Your Contact Information
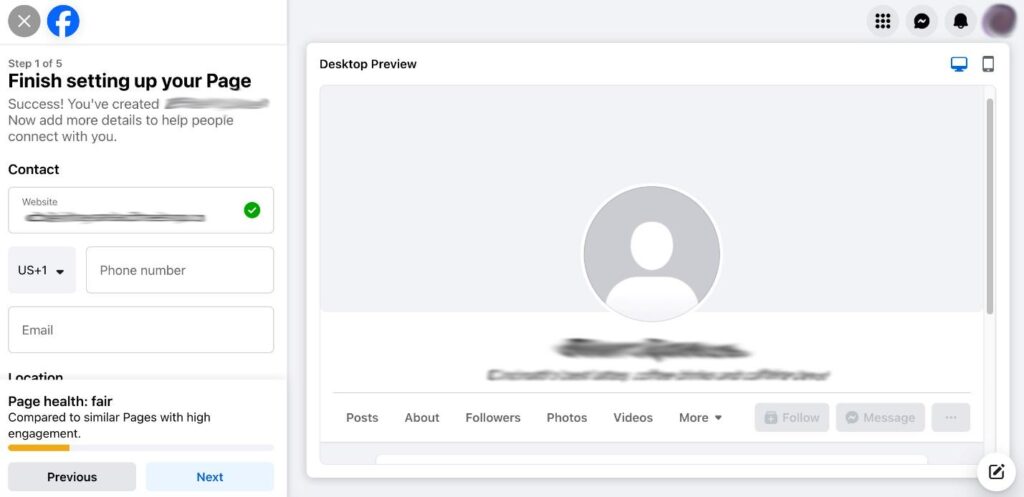
Next, you should enter your business’ contact details.
- It is recommended to provide details such as company phone number, email address, and URL.
- Keep in mind that the contact information will be publicly visible.
- It is also recommended to enter your business’ hours of operation.
Again, all the information can be updated later on. Once you have entered the information, click on ‘next’.
4. Add Images & Action Button
It is essential that you add a great profile image and a cover photo for your Meta business profile. You can use your company’s logo as the profile image. This image will be displayed alongside all your activities on Facebook. If you are going to use another image, it is recommended to use something that stands for your brand.
Before you add the Meta profile picture, keep in mind that it is cropped to a circle.
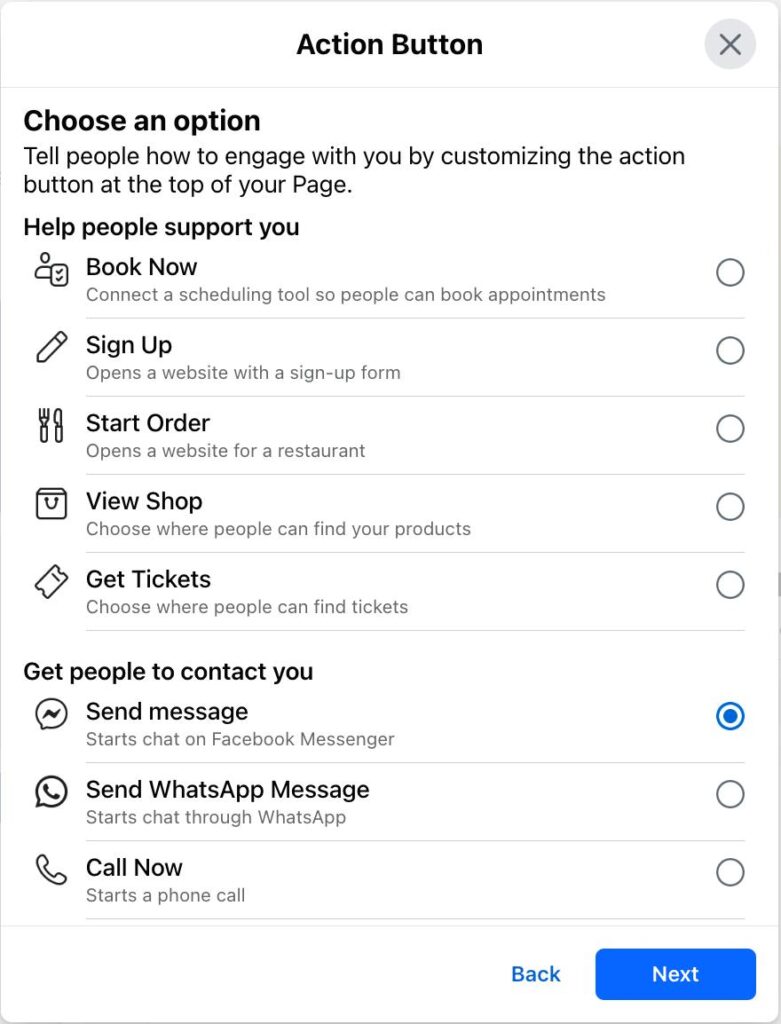
- The ‘add action button’ is displayed at the bottom of the area where the image is to be uploaded
- Click or tap on it to add a CTA button
- The different options that will appear include ‘start order’, ‘sign up’, ‘book now’, ‘get tickets’, ‘send message’, ‘call now’, and more.
Based on what action you want your audience to take, you can choose one of the options.
5. Invite Everyone to Like Your Business Page
Now that your Meta business account has been created, you must take all the steps to grow your fan count. Once you start creating and posting content, it is obvious that your follower count is going to increase. Still, this is a good stage to invite your Facebook friends to like your new business page.
6. Create Notification Preferences
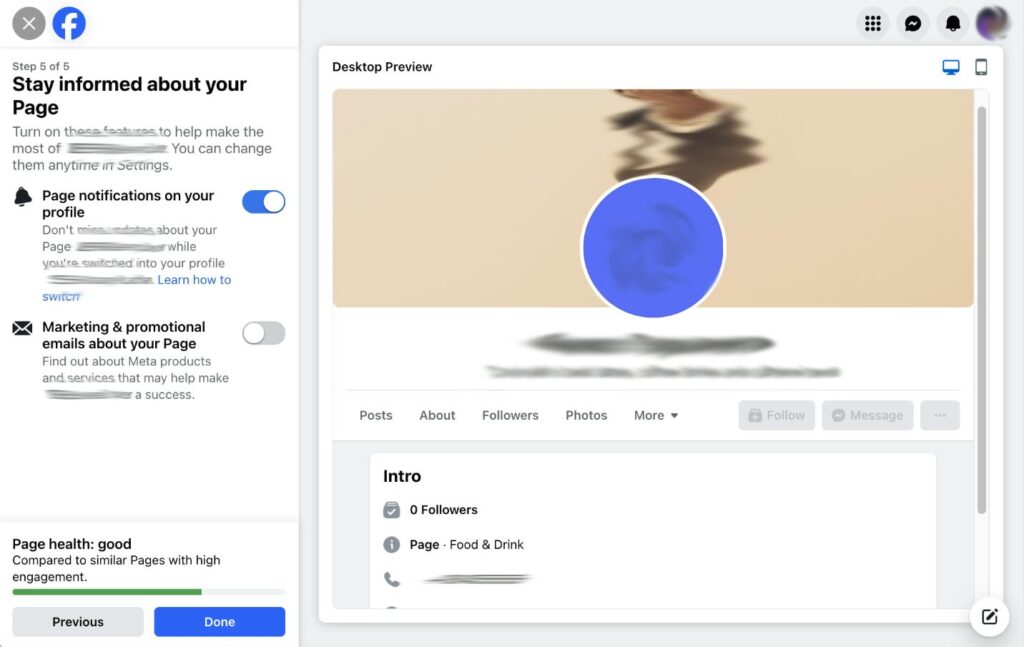
Every Meta business account creator will want to know when any activity takes place on their page.
- Toggle ‘page notifications on your profile’ to ON
- You can also set options here to opt-in or opt-out of promotional messages and Meta products/services
- Click on ‘done’ when it is all done
When the notifications are turned on, you will be receiving updates about your business page even when you are not logged into your personal account.
7. Customization
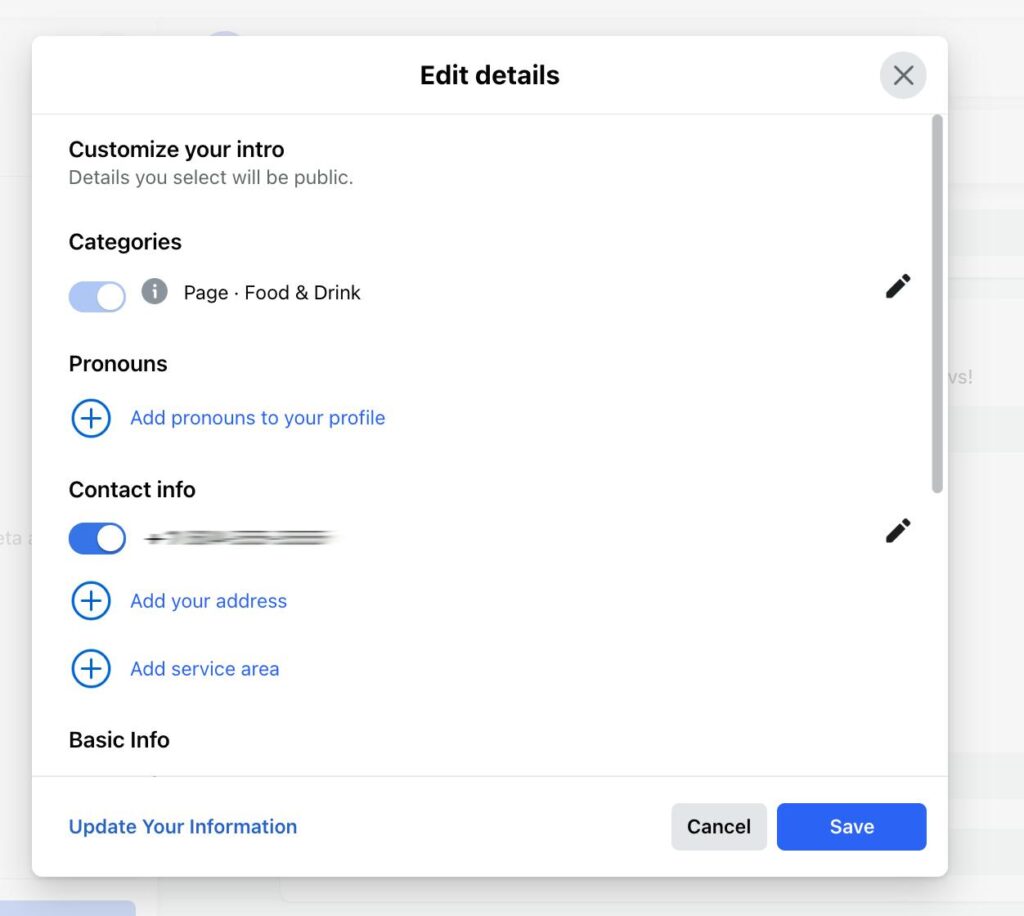
It is recommended to click on ‘edit details’ to enter additional details about your business. This information can help your followers to know what your business is about.
- Toggle the contact details ON/OFF
- Provide information about the area you service
- Provide a price range or information about the services you offer
- From the top menu, click on ‘more’ and choose the ‘manage sections’. Here you can control the sections that are

For example, you can uncheck the box against ‘reviews given’ if you want to hide others from knowing which pages you are leaving reviews for
8. Change Privacy Settings
Setting-up your Meta business account also requires customizing the privacy settings.
- From the left-hand side, click on ‘settings’
- Then click on ‘privacy’
- Make changes to the privacy settings based on your preferences
This can involve deciding whether you want to let others post on your business page or not. You can also determine whether people can leave reviews on your business.
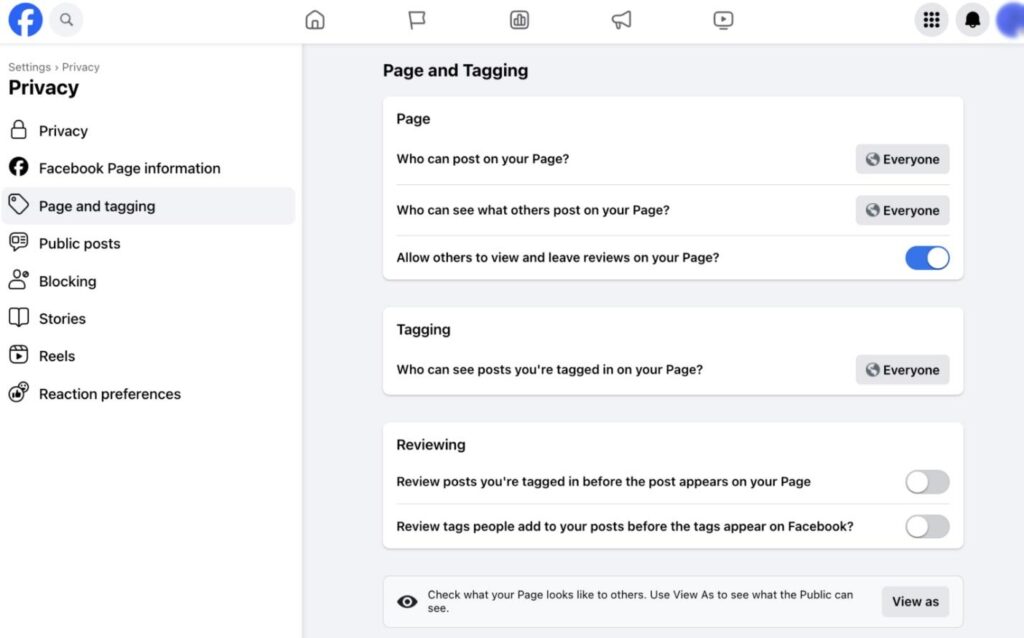
Again, like other features mentioned above, you can toggle the privacy settings ON and OFF whenever you like.
9. Create Your First Post
Now that your Meta business account has been created, you can start posting content. Posting content on a business page is similar to that on personal profile. You can share different types of content, including:
- Text
- Images
- Links
- Polls
You can also go live. Make sure to create content that informs, inspires, and entertains your target audience.
If you need professional help in creating and managing your Meta business account, it is recommended to get in touch with The Clear Imaging, Inc. You can reach out to us at (800) 380-6942 or write to us and we will get back to you at the earliest.


